

If you see visible mold inside your ducts, you’ve got a vermin problem, or your registers are blasting out piles of dust and debris, it’s time to call in a professional. Those are the three triggers that mean you should act now, not later. Musty odors, allergy flare ups, weak airflow, and a spiking energy bill are the next tier: real signs that your system needs a closer look.
TL;DR:
- Wet or moldy duct insulation generally cannot be cleaned effectively; professionals should remove and replace it while fixing the moisture source to prevent recurrence.
- Homes without warning signs can use three to five years as a baseline, but pets, renovations, smoking, allergies, or heavy system use may shorten it.
- Choose a provider who cleans the ducts, air handler, coils, and blower, then supplies before and after photos plus a written, itemized estimate.
- Visual checks usually suffice; reserve lab sampling or camera inspection for unclear evidence or when you need documentation before authorizing insulation replacement.
Table of Contents
- Checklist: 10 Clear Signs Your Air Ducts May Need Professional Cleaning
- How to Inspect Vents, Returns and Accessible Ductwork Safely
- When Mold, Moisture, or Pests Require Immediate Professional Action
- What a Professional Air Duct Cleaning Includes and How to Verify It Was Done Properly
- How Often You Should Consider Cleaning and Factors That Make It Sooner
- Preventing Recurring Contamination: Moisture Control, Filtration, and HVAC Maintenance
- Author Perspective: Practical Decision Making for Homeowners
- Breathe Easier With Home Service Simple’s Air Duct Cleaning
- FAQ
- Sources
Checklist: 10 Clear Signs Your Air Ducts May Need Professional Cleaning
Here’s the thing about dusty ducts: by the time you notice a problem, it’s usually been building for months. Think of your ductwork like the gutters on your house. Ignore them long enough and small stuff turns into a real mess.
Run through this list and be honest with yourself about how many boxes you’re checking.
- Dust or debris visible at vents and registers. Pull off a vent cover and if you see a thick gray layer or little puffs releasing when the air kicks on, that’s your system telling you something.
- Persistent musty or moldy odors from vents. A smell that shows up only when the HVAC runs, then fades when it shuts off, usually means the source is inside the ductwork itself.
- Allergy or respiratory symptoms that track with HVAC use. If sneezing, coughing, or itchy eyes get worse right after the furnace or AC kicks on and ease up when it’s off, your ducts are a reasonable suspect.
- Reduced or uneven airflow at registers. One room running cold while another bakes, or air that used to blow strong now barely trickles out, points to a blockage somewhere in the line.
- Unexplained spikes in energy bills. A system straining against clogged ducts has to work harder to push the same amount of air, and that shows up on your utility statement.
- Frequent HVAC breakdowns or short cycling. A unit that’s constantly turning on and off, or needing repair visits more often than it used to, may be fighting against restricted airflow.
- Filters clogging unusually fast. If a filter rated for 90 days looks packed solid at 30, dust is building up somewhere in the system faster than it should.
- Signs of pests inside ducts or near registers. Droppings, chewed insulation, nesting material, or the smell of urine near a vent are a clear signal, and the EPA names vermin infestation as one of the few conditions that justify duct cleaning outright.
- Water stains, standing water, or recent flooding near HVAC components. Any contact between your ductwork and water, past or present, raises the odds of hidden mold.
- No record of prior cleaning, especially after a renovation or a long stretch of ownership. Drywall dust from a remodel, years of normal household dust, or simply not knowing the home’s cleaning history are all reasons to get an inspection scheduled.
None of these, on their own, means you’re in crisis mode. But stack three or four together and you’ve got a strong case for getting someone out to look.
How to Inspect Vents, Returns and Accessible Ductwork Safely
Before you call anyone, you can check a lot of this yourself with a screwdriver, a flashlight, and five minutes.
- Turn off your HVAC system at the thermostat before removing any register, so nothing kicks on while your hand is inside.
- Unscrew the vent cover and shine a flashlight a foot or two into the duct, looking for a dust layer thick enough to see clumps rather than a fine film.
- Look for anything that resembles mold growth: black, green, or white fuzzy or speckled patches on metal or insulation surfaces.
- Check for droppings, shredded material, or a strong ammonia smell that would suggest pests have been living in there.
- Feel around the register boot for damp insulation or rust, both of which point to moisture that’s been sitting for a while.
For airflow, hold a tissue or a lightweight piece of paper near the register with the system running, a key step in troubleshooting weak airflow as explained in this homeowner’s guide. A strong draw means decent airflow. A weak flutter or nothing at all means something is restricting that line, and tracing which rooms are affected helps a technician find the blockage faster once they arrive.
Pro Tip: Snap a photo or short video of anything suspicious before you close the register back up. It gives a provider something concrete to look at instead of relying on your memory of “it looked kind of gross.”
If you spot substantial mold, a strong chemical odor, or anything that looks like active pest activity, stop there. That’s not a DIY cleanup job anymore, that’s a call for a professional inspection, and possibly a lab sample to confirm what you’re dealing with.
When Mold, Moisture, or Pests Require Immediate Professional Action
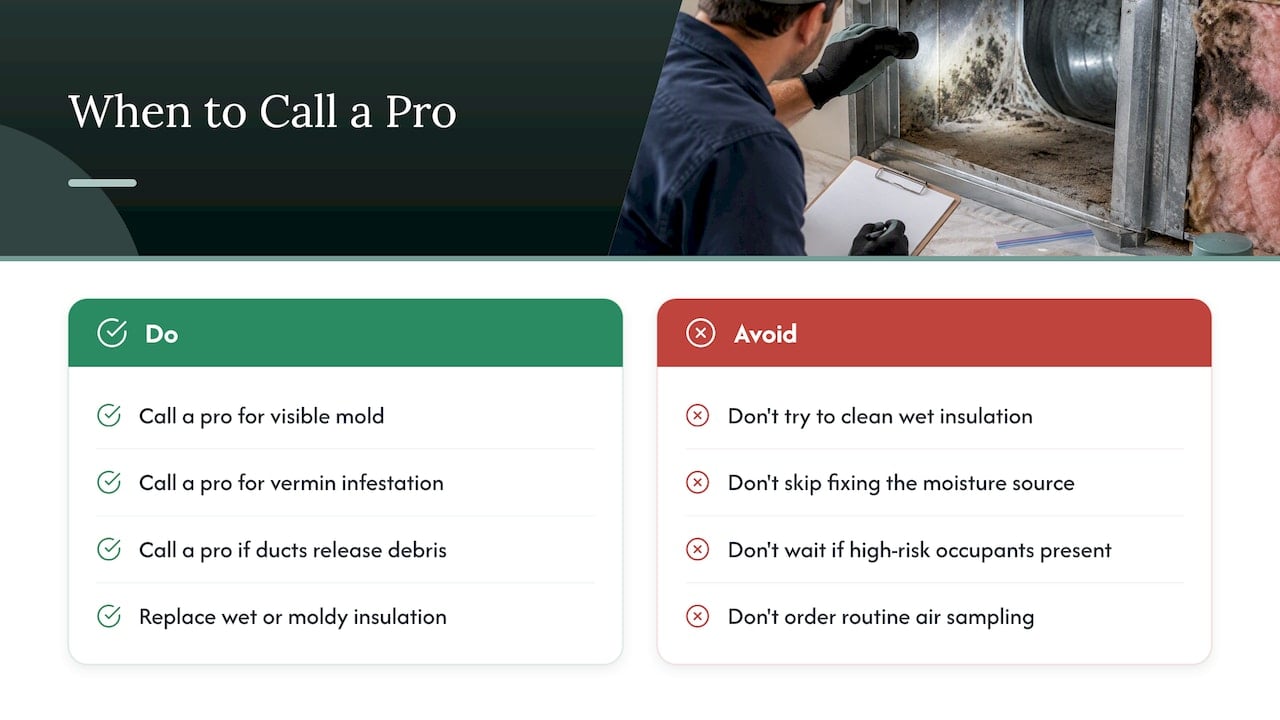
The EPA is pretty specific about this: duct cleaning is worth considering when there’s substantial visible mold growth inside hard-surface ducts, when ducts are infested with vermin, or when ducts are clogged with so much dust and debris that it’s actually releasing into the home through the registers. Those three conditions matter more than any seasonal schedule.
If duct insulation gets wet or moldy, it generally cannot be cleaned effectively and should be removed and replaced rather than treated.
That’s a key distinction a lot of homeowners miss. Cleaning works on hard metal surfaces. Once insulation or a lined duct has taken on moisture and started growing mold, cleaning it just pushes spores around instead of removing the problem, which is why replacement is usually the right call there.
On the health side, the CDC notes that exposure to mold in damp buildings is tied to respiratory symptoms and can make asthma worse, which is exactly why fixing the moisture source matters as much as the cleaning itself. Skip that step and mold just comes right back. People with asthma, allergies, or weakened immune systems are the ones who feel these effects first and hardest, so if anyone in your home falls into that group, don’t wait around on a maintenance schedule.
As for confirming what you’re looking at, a visual check handles most everyday situations: the dust, the obvious staining, the smell. Lab sampling or professional camera inspection comes into play when the visual evidence is ambiguous, or when you want documented proof before authorizing a bigger job like insulation replacement. Public health guidance generally doesn’t push for routine air sampling just to decide whether to clean, so save that step for cases where the stakes or the uncertainty are genuinely high.
What a Professional Air Duct Cleaning Includes and How to Verify It Was Done Properly
A real duct cleaning job isn’t just a hose shoved into your vents for ten minutes. NADCA recommends cleaning the whole system, air handler, coils, and blower included, because leaving any one of those pieces dirty just reseeds the ducts with contamination right after the crew packs up.
A thorough job typically looks like this:
- A pre-inspection of the ductwork and air handler, often with a camera, to document the starting condition.
- Agitation of dust and debris inside the ducts using brushes or air whips, combined with a powerful vacuum to pull contaminants out rather than just stir them around.
- Cleaning of the coils, blower assembly, and drip pan, since these parts collect just as much buildup as the ducts themselves.
- A final walkthrough or photo set showing the cleaned components, so you have something to compare against the before shots.
Watch for red flags straight out of FTC guidance on home improvement scams: heavy pressure to sign on the spot, a demand for full payment up front before any work starts, or a quote so vague it doesn’t list what’s actually included. A legitimate provider gives you a written, itemized estimate and doesn’t flinch when you ask questions.
Before hiring anyone, ask what the service covers, whether they inspect and clean the coils and air handler or just the ducts, and whether they’ll provide before and after documentation. After the job, ask to see the photos or footage and compare them against what you saw during your own inspection.
Duct leakage can waste a significant portion of the air moving through a typical forced-air system, according to ENERGY STAR, which means a sloppy or partial cleaning job isn’t just a missed opportunity, it’s ongoing money leaking out through gaps a thorough provider should catch.
How Often You Should Consider Cleaning and Factors That Make It Sooner
There’s no single rule that fits every home, but a commonly cited guideline lands around every 3 to 5 years for an average household with no major red flags. That range works as a baseline, not a deadline, and plenty of homes do fine stretching closer to five years while others need attention well before three.
Several things push that timeline earlier:
- Pets shed hair and dander that build up in ductwork faster than in a pet-free home.
- A household member who smokes indoors adds residue that clings to duct surfaces and recirculates.
- Recent renovation or construction work generates drywall dust and debris that often ends up pulled into the return vents.
- Someone in the home dealing with allergies or asthma benefits from a shorter interval since even moderate buildup can aggravate symptoms.
- Homes in dusty regions or with heavy HVAC runtime through long summers and winters accumulate debris faster than moderate climates allow.
If you’re dealing with any of the EPA’s three immediate triggers, visible mold, vermin, or heavy debris release, the 3 to 5 year guideline becomes irrelevant. Those conditions call for action now regardless of when the last cleaning happened. For a deeper breakdown of timing based on your specific situation, our guide on air duct cleaning frequency walks through more scenarios.
Filter quality and how often your system runs also shape how fast ducts get dirty. A cheap, low-rated filter catches less and lets more particles pass through into the ductwork, while a system that runs nearly nonstop during extreme seasons pushes more total air, and more total dust, through the same lines.
Preventing Recurring Contamination: Moisture Control, Filtration, and HVAC Maintenance
Cleaning solves today’s problem. Prevention keeps you from doing this again in eighteen months.
Moisture is the root cause behind most duct mold, so fixing condensation issues, drainage problems, and any leaks around your HVAC unit matters more than any cleaning schedule. The EPA’s guide to mold and moisture is blunt about it: cleaning without addressing the moisture source is often wasted effort, since the same conditions just grow it back.
A few habits that cut down on future buildup:
- Replace filters on the schedule your manufacturer recommends, and don’t assume a higher-rated filter always means better performance for your specific system.
- Check the drip pan and coils periodically for standing water or buildup, since these are common moisture sources hiding in plain sight.
- Inspect duct seals and connections for gaps, since leaky seals pull in dust from attics or crawl spaces that then gets redistributed through your home.
- Consider duct sealing or insulation upgrades if you’re losing a noticeable amount of conditioned air, which also reduces the dust and moisture exposure tied to leaky sections.
Pro Tip: Mark your filter replacement date on the filter itself with a marker. It takes ten seconds and saves you from guessing three months later whether you already swapped it.
Author Perspective: Practical Decision Making for Homeowners
Here’s where I land on all this after walking through the checklist, the inspection steps, and the guidance behind them: most homeowners either panic over normal dust or ignore real warning signs because nothing looks dramatic yet. Neither reaction serves you well.
Start with the three hard triggers: visible mold, vermin, heavy debris release. Those aren’t judgment calls. Everything else, the odors, the allergy symptoms, the weak airflow, deserves a real inspection rather than a shrug.
When you do hire someone, insist on whole-system service and documented proof, not just a quick duct wipe-down. And whatever you do, fix the moisture problem first. A clean duct sitting next to a leaky drip pan is just a clean duct waiting to get dirty again.
— chris
Breathe Easier With Home Service Simple’s Air Duct Cleaning

If you’ve worked through this checklist and you’re ready to get it handled, we offer professional air duct cleaning built around the whole-system approach that actually prevents recontamination, not just a quick pass through the visible ductwork. We walk you through what is found, show before and after results, and provide clear information without a sales pitch.
A few quick steps to get started:
- Request an inspection to understand what is inside your ducts before any quote.
- Ask for camera photos or video documentation, both before and after, so you have proof of the work.
- Get an itemized estimate that spells out what is included, such as cleaning of ducts, coils, and the air handler.
Curious what a typical appointment looks like start to finish? Our breakdown of what a 3 to 5 hour air duct cleaning includes covers the full process and the questions worth asking any provider you consider.
This article is general information, not a substitute for advice from a qualified doctor. Consult a qualified healthcare professional about your own circumstances before acting on anything here.
FAQ
Is it okay to never clean air ducts?
For most homes, waiting is fine as long as none of the EPA’s three triggers apply: visible mold, a vermin infestation, or heavy dust and debris releasing into the home. Once one of those shows up, waiting any longer than necessary raises the risk of ongoing contamination and recontamination of your air.
What time of year should you clean your air ducts?
There’s no official required season, but many homeowners schedule cleaning in spring or fall, right before heavy HVAC use ramps up for summer or winter. Timing it ahead of peak usage means your system runs more efficiently when you need it most.
Does cleaning air ducts really make a difference?
It can, particularly when the job addresses the whole system rather than just the ducts. NADCA notes that cleaning only the ductwork while leaving the air handler and coils dirty often leads to fast recontamination, so the benefit really depends on scope.
What should I check before choosing an air duct cleaning provider?
Ask whether the service covers the full system, including the air handler, coils, and blower, not just the ducts themselves. Request a written, itemized estimate and before-and-after documentation, and watch for pressure tactics or demands for full payment up front, both flagged as common scam patterns by the FTC.
Sources
- Should You Have the Air Ducts in Your Home Cleaned? | US EPA
- Proper cleaning methods | NADCA
- Mold | CDC
- How to avoid home improvement scams | FTC